CS 307 Final Project: Up House
Sharon Kim and Stacey Kim
{ sharon.s.kim, stacey.kim }@wellesley.edu
→ Links: demo, code ← Note: Depending on your computer, the demo will take 5-30 seconds to load fully.
For our final project, we decided to recreate one of the iconic scenes from Up, the 2009 Pixar film about the adventures of a widowed, elderly man and his young companion.
Below, we have created an outline of highlights in our project, categorized topically.
Hierarchical modeling
Our house is by far the most involved part of the project. Structurally speaking, there are two main parts to the house: the baseBarn and the crossBarn. As their names suggest, they intersect perpendicularly.
The entire house is at least partially parameterized by the width of the baseBarn, which allows for intuitive positioning and proportionality of appearance throughout. Below, we highlight some interesting aspects of the house code.

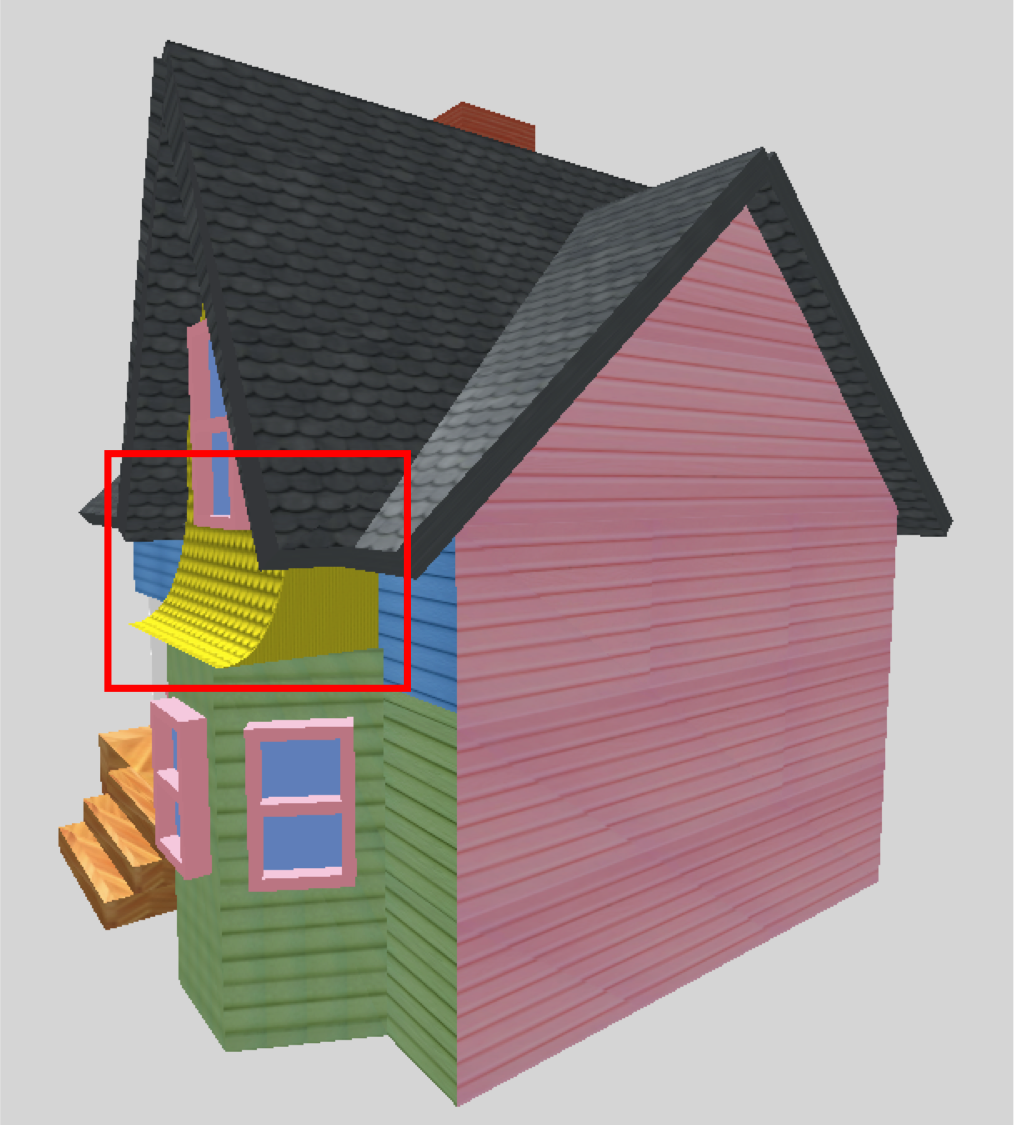
Bay structure. The bay structure is the portion boxed in red above. It was created with a THREE.ExtrudeGeometry. See the code below for more specifics.
var extrudeSettings = {
  amount: height,
  bevelEnabled: false,
};

var pts = [[0.1,0], [0.3,-0.65], [0.7,-0.65], [0.9,0]].map(function(pt) {
  return new THREE.Vector2(pt[0] * width, pt[1] * length);
});
var shape = new THREE.Shape(pts);
var geometry = new THREE.ExtrudeGeometry(shape, extrudeSettings);
pts stores the rough outline of the half-hexagonal shape I want to capture. The map function allows it to be parameterized by the correct width and length, which are inputs to the function. Inputted with extrudeSettings to a THREE.Shape, we get the bay structure pictured above. Voilà!
Windows, window panes, doors, stairs, and chimney. Because these structures have so many box-like structures in common, they are all made using a single Box function with different size parameters. This is a bit mind-boggling considering we have 10 windows, 2 doors, 2 sets of stairs, and many window panes in all.
Material and lighting
Material. Most of our material is made of THREE.MeshPhongMaterial, since we wanted to be sure our house would appropriately interact with the light. However, the material of the background (sky and clouds) is just a THREE.MeshBasicMaterial because we wanted the house to appear as if floating in mid-air. In real life, the substance of the sky does not reflect light like the shiny surface of a car would, for example, so we wanted to make sure that the sky wouldn’t interact with any of the light sources in that manner. Using a THREE.MeshBasicMaterial would accomplish this effect.
Lighting. We have two light sources in our code. One is a THREE.AmbientLight for general and uniform lighting throughout the scene. The other light source is a THREE.DirectionalLight coming from the sun with reduced intensity so as to not drown out the colors of the house.
Curved surfaces
We have two significant uses of Bezier curves and surfaces in our code.
Gable curve. The gable curve was created using a combination of THREE.CubicBezierCurve3 and THREE.ExtrudeGeometry. However, because texture mapping a geometry of this type proved to be challenging, we were forced to drape a Bezier surface on top of the structure, because we knew this surface’s texture mapping mechanism to be simpler and more doable. The structure itself was rendered using the following code:
var extrudeSettings = {
  amount: length,
  bevelEnabled: false,
}

var pts = [[0,1,0], [0.1,0.4,0], [0.4,-0.01,0], [1,0,0]].map(function(pt) {
  return new THREE.Vector3(pt[0] * width, pt[1] * height, 0);
});

var curve = new THREE.CubicBezierCurve3(pts[0], pts[1], pts[2], pts[3]);
var points = Array.prototype.concat( curve.getPoints(10),
                                   [ new THREE.Vector3(-10,0,0), new THREE.Vector3(-10,height,0) ]);
var shape = new THREE.Shape(points);
var geometry = new THREE.ExtrudeGeometry(shape, extrudeSettings);
Up until var points, the code is very similar to how the bay structure was created above. So, to explain, the function of points is to ensure that the curve extrudes in the concave direction, as opposed to the convex. So in addition to the outline of the points created by pts, we concatenate two more points to the list of control points that would force the extrusion in the opposite direction. Without this line of code, we would create a convex structure, opposed to a concave one.
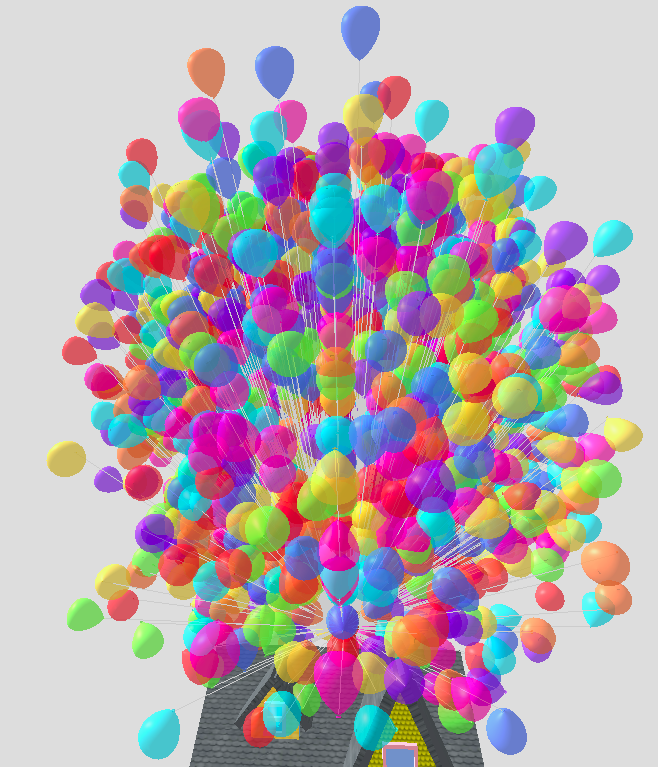
Balloons. We made a small but computationally significant adjustment for rendering the balloon cloud.
var _balloonBezier = new THREE.CubicBezierCurve(
  new THREE.Vector2(-0.05, -0.05),
  new THREE.Vector2(0.35, 0.1),
  new THREE.Vector2(0.8, 0.95),
  new THREE.Vector2(0, 1)
);
var _balloonPoints = _balloonBezier.getPoints(20);

var _makeBalloon = function(height) {
  var controlPoints = _balloonPoints.map(function(cp) {
    return cp.multiplyScalar(height);
  });
  var balloonGeometry = new THREE.LatheGeometry(controlPoints, 20);
  var balloonMaterial = new THREE.MeshPhongMaterial({
    color: UTILS.getRandomColor(),
    shininess: PARAMS.balloon.shininess,
    transparent: true,
    opacity: PARAMS.balloon.opacity
  });
  return new THREE.Mesh(balloonGeometry, balloonMaterial);
};
The outline of the balloon is drawn with a THREE.CubicBezierCurve and then multiplied by a scalar, the balloon’s height, to ensure proportionality. The geometry is a THREE.LatheGeometry to give the balloon its three-dimensional shape. (It’s worth noting there’s another use of transparency here by setting the transparency and opacity attributes of the balloon.) Then, the balloon is appropriately tilted so that its y-axis lines up with the ribbon it will be attached to later, like so:
result.calculateRotation = function() {
  var deltaY = position.y + PARAMS.ribbon.height;
  var aRotation = Math.tan(position.z / deltaY);
  var cRotation = -Math.tan(position.x / deltaY);

  return { a: aRotation, b: 0, c: cRotation };
};
Making the ribbon is a simple THREE.Line, so I won’t paste that here. Generating balloon positions is quite fascinating, though, since the balloons are also jittered, so that the rendered appearance of the edges of the balloons isn’t so jagged.
var _generateBalloonPositions = function() {
  var positions = [];

  for (var i = -PARAMS.meshRadius; i < PARAMS.meshRadius; i++) {
    for (var j = -PARAMS.meshRadius; j < PARAMS.meshRadius; j++) {
      for (var k = -PARAMS.meshRadius; k < PARAMS.meshRadius; k++) {
        var distanceFromOrigin = Math.sqrt(Math.pow(i, 2) + (Math.pow(j, 2) / 20) + Math.pow(k, 2));
        if (distanceFromOrigin <= PARAMS.meshRadius) {
          UTILS.callTwice(function() {
            positions.push({
              x: _jitterMeshPosition(i),
              y: _jitterMeshPosition(j),
              z: _jitterMeshPosition(k)
            });
          });
        }
      }
    }
  }
  return positions;
};
Since this is a triple-nested loop, this is definitely the most computationally expensive part of the code. So the higher the meshRadius, which is the upper bound of each for loop, the longer the scene takes to render. The positions of each of the balloons is constrained by the sphere denoted by distanceFromOrigin. This is how the mass of balloons manages to form a circular shape, instead of being rendered across the whole scene willy-nilly.
Our main contribution to the Balloon code. The change we made was to give the balloon mass a more ovular shape. This would allow us to get away with a sparsely populated balloon cloud (a lower meshRadius), which is computationally cheaper, while still maintaining a convincingly large balloon cloud shape. We did this by considering the equation for an ellipsoid:
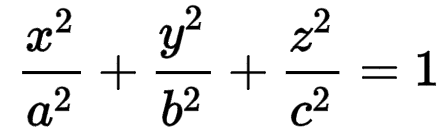
Since we want the balloon mass to appear taller and not as spherical, we adjusted the b value to be 20, which is greater than 1, which is what it was before. We determined this value by looking at the balloon cloud for different combinations of meshRadius and b values. Since we wanted to stick to a relatively small meshRadius, we settled on the value 5. From there, we determined that the effect of increasing the b value diminshes considerably when it is around 20, so b = 20. You can see this in the code pasted above, at:
var distanceFromOrigin = Math.sqrt(Math.pow(i, 2) + (Math.pow(j, 2) / 20) + Math.pow(k, 2));
Textures and texture-mapping
We use a total of 14 different textures in our code for two different purposes.
Textures for the house. Most of the loaded textures are solely devoted to texturing the house. Along with meticulous texture mapping, we made sure that the loaded images themselves were reasonably proportioned. For example, all of the colored panels for the walls of the house have around six rows of panels in each .jpg image. Some copy+pasting using pixlr, the online photo editing tool, made this possible. Although we did make efforts on the .jpg scale to make texture mapping in the back-end more tractable, it was challenging and time-consuming to map each of the vertices of our varying structures to each of the vertices of our textures. Unfortunately, we sometimes had to split a function that creates two different but very structurally similar geometries into two because of differing texture coordinates, which didn’t make for very clean code. It would be nice if there was a less clunky way of attaching texture coordinates to geometries moving forward.
Textures for the scenery. Three of the textures are for setting the scene. For example, the clouds are a screenshot of mr doob’s cloud scene transposed on a THREE.PlaneGeometry. This was a reasonable way of creating our background because we didn’t want the clouds to be animated, as they were in mr doob’s implementation. One of the other textures is for creating the plane, which was similarly implemented. The last texture is for the sun’s rays, which we will discuss next.
Transparency
We have three main uses of transparency in our code.
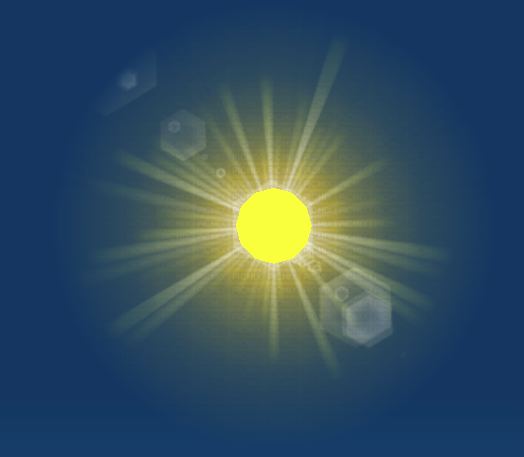
Sun’s rays. The sun is surrounded with rays, which is an image downloaded from a Google image search. We transposed this texture onto a completely transparent THREE.PlaneGeometry, so we didn’t have to modify the opacity attribute; simply adjusting the transparent attribute to true sufficed. The sun itself is a separate THREE.SphereGeometry, but the sun and its rays have been positioned in the same place to create the effect of the brightly shining sun.
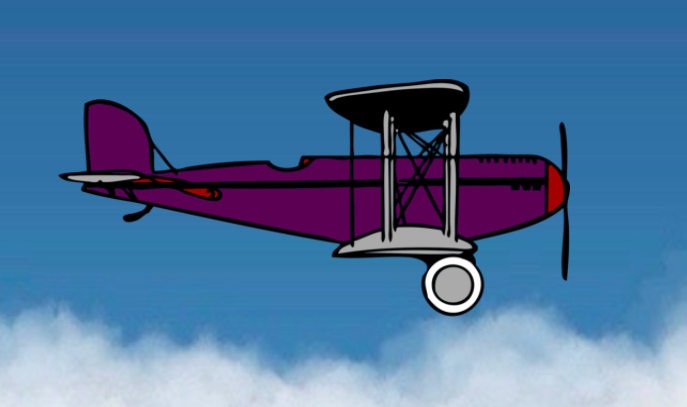
Airplane. The second use of transparency is in the airplane. Instead of making our own plane with Three.js objects, we textured an image of a plane on a completely transparent THREE.PlaneGeometry.
Balloons. As briefly noted above, each of the balloons has their transparency attribute set to true, and the opacity attribute set to 0.7.
Animation
We have two animations in our code.
Up house. Like in the movie, the house floats into the skies. This is a simple upHouse.position.y movement upwards. Hopefully Mr. Fredricksen doesn’t fly too far above the clouds before he becomes short of breath. :)
Airplane. We add our own contribution to the movie scene here and animate an old-fashioned, Wright brothers-style airplane flying horizontally across the skies. Similarly, this is a simple airplane.position.x movement across the scene.
Future work
Because the balloon cloud is so computationally expensive and slows down the animation, it would be great if we could come up with a computationally cheaper solution in the future. One idea we had was to create a hollow balloon cloud; balloons are rendered only in the ellipsoid-shaped outline of the cloud. However, we’re not sure what kind of an effect this would have on the overall colorfulness of the cloud, since one of the reasons for the its extremely colorful appearance is the transparency of the balloons: the way the partially transparent ballons overlap and interact with each other in the light gives the cloud its colorful appearance. Maybe this would be a small price to pay for the potential computational inexpensiveness of creating a hollow balloon cloud, which would allow a smoother animation.
Copyright (C) 2017 Sharon Kim, Stacey Kim, {sharon.s.kim, stacey.kim}@wellesley.edu, and Sarah Walters (swalters4925@gmail.com).
This program is free software: you can redistribute it and/or modify it under the terms of the GNU General Public License as published by the Free Software Foundation, either version 3 of the License, or (at your option) any later version.
This program is distributed in the hope that it will be useful, but WITHOUT ANY WARRANTY; without even the implied warranty of MERCHANTABILITY or FITNESS FOR A PARTICULAR PURPOSE. See the GNU General Public License for more details.
You should have received a copy of the GNU General Public License along with this program. If not, see http://www.gnu.org/licenses/.